Table of Contents
If you don’t want to rely on luck to create appealing sounds with a synthesizer, then you cannot avoid understanding the description of the temporal progression of a sound: the envelope. The ADSR envelope covers pretty much every sound on non-synthetic musical instruments, which is why it is one of the most popular.
But don’t worry, you don’t have to study physics to comprehend this for your sound design. An envelope is triggered by playing a key on a synthesizer. You will now learn what actually happens when you press and release the key and how you can use this to create sounds.
Why Envelopes in Sound Design?
Modifying the envelopes in sound design is one of the most effective methods for creating cool sounds.
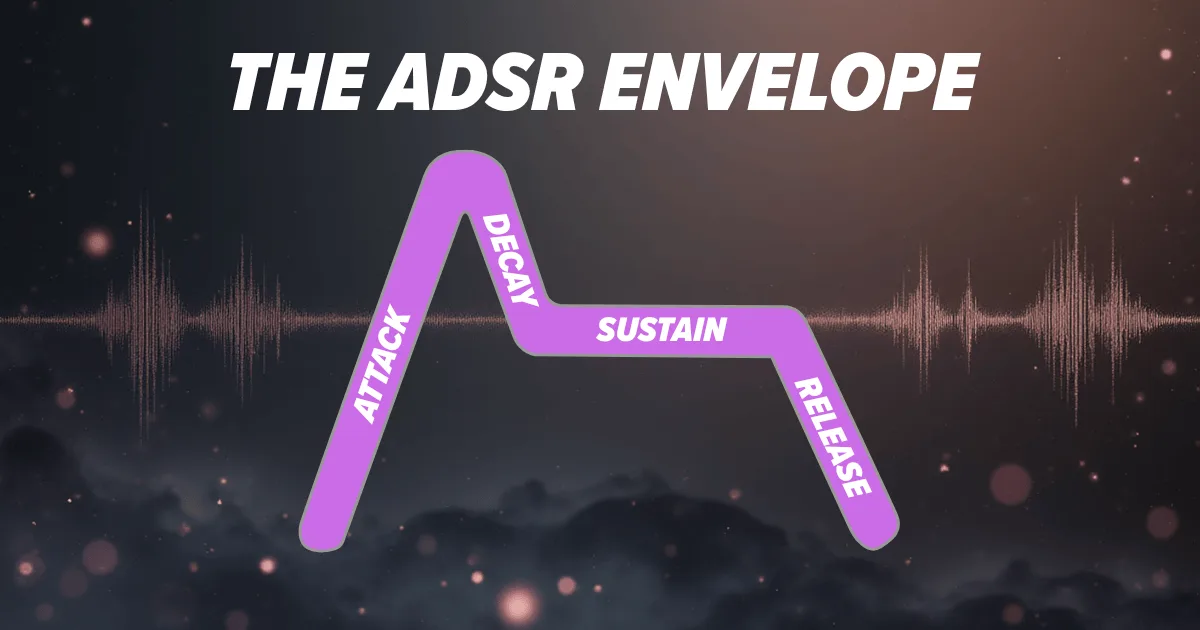
The Four Stages of the ADSR Envelope
In sound synthesis, the synthetic generation of sound or the modification of natural sound, the abbreviation ADSR means the four phases of a sound’s envelope.

Attack
Attack determines how long it takes for the amplitude to reach its maximum level. The ADSR Envelope diagram always shows the maximum possible amplitude. On the left at the beginning of the attack phase, the amplitude is always 0 and rises to its maximum amplitude over the course of the attack time.
If the attack time is very, very short, i.e., the attack control on your synthesizer is set to a very low value, the maximum amplitude is reached extremely quickly in the attack phase. This is why sounds with a short attack sound much louder than those with a very long attack. With a longer attack, it takes much longer to reach the maximum, so there is not enough time for t
Attack Change on Roland JUNO-60
Decay
With non-synthetic musical instruments, the volume settles at a slightly lower level after initially reaching its maxim
The decay phase works according to the same principle. This is the time it takes for the volume to fall from its peak value to its sustain value, or in other words, to stabilize.
Decay Change on Roland JUNO-60
Sustain
Sustain is the level to which the peak drops and is held as long as the key remains pressed. At a low sustain level, the sound drops quickly and sharply from its peak level. The sound then often sounds percussive and quieter. In contrast, at a high sustain level, the sound does not drop as sharply and seems relatively loud compared to the low sustain level.
Sustain level change on Roland JUNO-60
Release
As soon as you release the key, the release phase of the ADSR envelope begins. The release time determines how long the sound continues to fade after you release the key. If you want the sound to end abruptly after releasing the key, set a short release time. However, if you want the sound to fade out slowly and gradually, select a long release time.
Release time change on Roland JUNO-60
Examples of ADSR Envelope Sound Design
Before we begin with the examples, set an Init Preset in the Roland Cloud JUNO-60 without any adjustments, use essentially a preset with a reset to the default values.
I won’t give you fixed values for the controls, but rather ranges. Once you’ve finished adjusting everything, I recommend playing around with different values within these ranges. This will help you get a feel for the right sound.
Soft Ambient Pad (Slow Attack) on Roland JUNO-60
ADSR envelope: Attack, Decay, Sustain, Release

To create the gentle fade-in effect typical of ambient pads, start the Attack slider at 0 and slowly increase it to between 180 and 220. As you push up, listen to the differences in sound as you play the same note repeatedly on the keyboard.
Do the same for the Decay control, starting at 0 and increasing to 180 to 220.
You set the Sustain level in the range from around 200 to 255.
To complete the ADSR envelope settings, all you need to do now is set the Release in the range of 180 to 255.
Reverb

Set the Reverb type (bottom right on the Roland Cloud JUNO-60) to Hall 1, the Reverb time to 120 to 170, and the Reverb level to between 60 and 100. These Reverb settings add more space and depth without overly masking the ADSR envelope.
Saw, Chorus I or II

Turn on Chorus I or II.
Waveform (DCO)

In the DCO section, set the Saw Wave form control to the maximum value of 255. Set the Pulse, Sub, and Noise controls to 0.